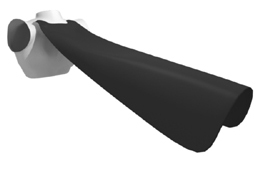
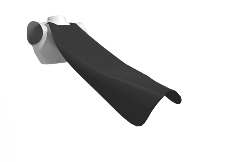
CHARACTER CAPE
Rob O'Neill:
Make a cape and work with collisions
Rob O'Neill has experimented with cape-making while in early stages of production of his super-hero
short film, "Blank". Rob is sharing here his knowledge of how to make a basic
character cape by implementing pins, collisions, forces, and one little script...
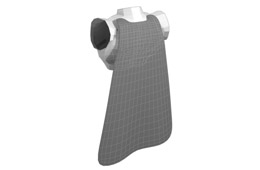
Rob used Maya 6.5 for this tutorial, and started by constructing a demonstration torso and a cape. You can
build your own geometry, or download this Maya Scene, where you will find a ready-made torso, and cape.
These are both straight forward polygonal models created in Maya.
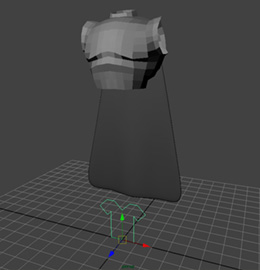
01. BUILD YOUR ASSETS:
Creating and positioning the poly shapes
If you are building your own assets for this tutorial it may be worthwhile to match the scale of the example
file as the simulation settings described below are somewhat size dependent. In any case your polygonal objects can be anywhere
in the scene but make sure your cape is in the place you desire in relation to the body and make sure to freeze
its transformations (and I would generally delete history on a simulated object).
02. CREATE CLOTH, turn the cape geometry into a syCloth:
Creating and positioning the poly shapes
Select your cape, and turn it into a syCloth, by calling:
Syflex > Cloth > Create Cloth
The cape shape is now a syCloth and a T-shirt icon
appeared in the middle of the grid. This icon can be moved and scaled, and is handy in many situations. You
can easily select the syCloth by selecting it. Each force and constraint comes with their own special icon.
03. ATTACH THE CAPE TO THE BODY GEOMETRY:
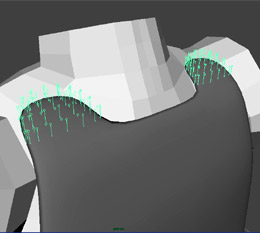
Adding a lot of pins procedurally
Before you do anything else it's time to attach the cape to the body. In this case, we are going to use pins
to connect all touching points of the cape to the body geometry. Select the vertices to be pinned, and the related
body geometry, then call:
Syflex > Constraints > Pin
Considering that we are dealing with fairly high resolution geometry, the task of doing this one cape vertex at a time seems daunting so I've written a small script that you can run to attach all the selected vertices
to the supplied geometry:
global proc roboSyflexMakePin(string $inputSurface)
{
    string $pointsSelected[] = `filterExpand -ex true -sm 31`;
    string $singlePoint;
    for($singlePoint in $pointsSelected)
    {
        select -r $singlePoint;
        select -add $inputSurface;
        syCreatePin;
    }
}
In the case of the tutorial file you would (after sourcing it) select the cape vertices you want to pin
and make this call from the script editor:
roboSyflexMakePin body_geom
Running the script, you'll notice that after a few seconds, each cape vertex selected will have a little
pin icon attached to it. You'll want to group these many pins together to keep your scene neat.
04. DEFINE THE EXTERNAL FORCES:
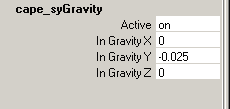
Gravity settings
Damp settings
The starting point for me in creating a cloth simulation is attaching gravity to the object. Select the syCloth,
and call:
Syflex > Forces > Create Gravity
The next thing to do is to tone down the motion a bit by adding a damping force. Select the syCloth again and call:
Syflex > Forces > Create Damp
The images here represent the settings needed to get the same results as the tutorial.
As always, by turning "Active" off, you can mute the force temporarily. This is really useful for testing. When adding
forces it's a good idea to simulate your cloth to see how the force actually affects it, layering and isolating each force is the
best way to become familiar with them.
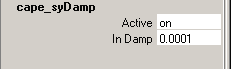
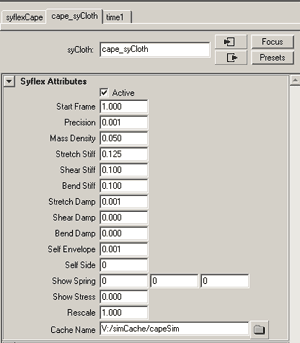
05. TUNE THE SYCLOTH ATTRIBUTES:
syCloth attribute settings
Now it is time to adjust out syCloth settings directly. I increased the "mass density" to have the cloth behave
as if it's heavier or thicker fabric. I also turned up the stretch, shear and bend stiffness and their associated
damp to also give the impression that this material is thick. In my world the character's capes are a heavy material,
your world may differ. The stretch, shear and bend attributes are your main controls for describing the nature
of your cloth's motion.
We added self collision by entering a small value in "Self Envelope". Collisions tend to make the simulation
slower, so use them sparingly. Here, the "Self Envelope" value prevented the cape from penetrating itself.
Keeping "Self Side" at 0 has us detecting collisions on both sides of the cloth object.
06. ADDING THE BODY COLLISIONS:
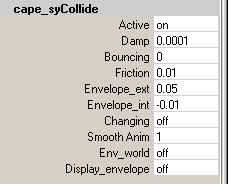
Collision settings
For the proper behavior of our cape we need to make it collide with the character's body.
In SyFlex this is pretty straight-forward. You will want to select the syCloth, and the geometry
to collide with and call:
Syflex > Collisions > Create Collider
Running your simulation now will reveal your cape hitting the body but not going through it. To clean this
up a bit, we'll adjust the syCollide node's attributes. In the case of this geometry I've increased the "Envelope_ext"
to 0.05 to give myself a little more padding between the cape and the geometry at the moment of collision. Depending
on your models and the speed of the character/cloth motion at the time of collision these may require further tuning.
I've also put a small value in the "Friction" attribute so the cape sticks to the geometry a little. The envelopes and friction settings are
the ones I adjust most to get the best results. Each polygonal object required for collision would have its own syCollide node.
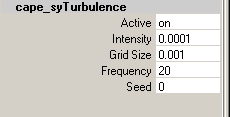
07. ADDING MOTION VIA WIND AND TURBULENCE:
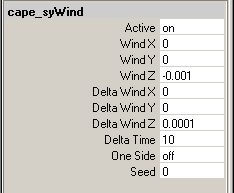
Wind settings
Turbulence settings
As we are showing our cape in a static shot we will add some wind forces to give it a little life.
Syflex > Forces > Wind
In our example we tone down the "WindZ" attribute to -0.001 and the "DeltaWindZ" to 0.0001 to give
the impression that we're experiencing gusting winds
To create additional variation to the movement of the cape, we applied Turbulence.
Select the syCloth and call:
Syflex > Forces > Turbulence
Turbulence creates movement offsets for each "square" of a grid which you define in the "Grid Size" attribute.
08. SIMULATE, CACHE, AND RENDER:
Cache path
Once your settings are where you would like them and you're getting the results you want it's a good idea
to set the cache path for your syCloth object. This allows you to bake out your simulation and lock it for
rendering across multiple machines.
Render and enjoy.
Rob is the Studio Technical Director at Eyebeam in
NYC and was previously a Character Technical Director at PDI/Dreamworks. You can reach
him at: rob[at]morphometric.com
In-depth information about every aspect of syFlex, including the elements used in
this tutorial, are available in the software documentation.
If you have any additional questions, do contact us at:
users@syflex.biz
|