 |
HANGING LAUNDRY
Learn the Very Basics of syFlex
In this tutorial from Syflex, we will go over the basics, by... Hanging laundry:
Turning a simple plane into a syCloth, applying Gravity and Damp forces onto it,
pinning it to the string using one of the syFlex constraints,
and lastly, blowing some wind, so it really behaves.
This tutoriel provides a nice overview of the basics of syFlex for new users, or, if
you don't have syFlex yet, look here to get a sense of just
how simple and powerful it is.
We used Maya 6.0 for this tutorial, and we started by constructing a string to
hang the laundry on.
You can build your own string, or download this
Maya Scene,
where you will find a ready-made string, already simulated,
complete with a pair of clips (note).
01. CREATE YOUR CLOTH SHAPE, make a poly mesh:
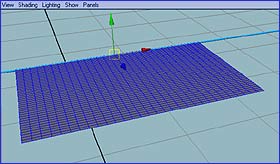
Modeling and positioning the poly shape
Any poly mesh can become a syCloth. Here, we created a simple plane to become
a sheet of cloth.
Our plane is the default Maya 1x1 plane, subdivided by 30 width and 40 height,
and scaled a bit so it is more rectangular. We recommend that you follow those
dimensions, so our parameters will work for you.
Translate and rotate your plane to the position you want to start the animation from.
It is better to do all the translation before you turn it into a syCloth.
We started the cloth at 90 degrees to its "hanged" position to have more drama
in the animation.
02. CREATE CLOTH, turn your shape into a syCloth:
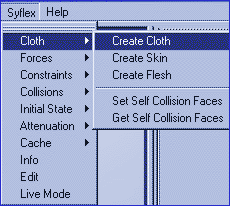
This is the whole syFlex menu
Select your plane, and turn it into a syCloth, by calling:
Syflex > Cloth > Create Cloth
Take a look at the syCloth set of attributes; Select your syCloth, either
by pointing at it in the 3D view, or in the
Outliner (either the output shape node, or the syCloth node) and examine
the available attributes in the Channel Box.
More attributes are available in the Attribute Editor window.
In this tutorial, we are focusing on two attributes: Mass Density and
Spring Stiffness.
03. GIVE YOUR SYCLOTH CHARACTER, define attributes:
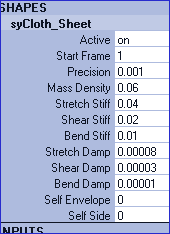
SyCloth attributes
The Mass Density is the mass of a 1x1 surface unit of the cloth.
Together with the Gravity force (coming next) it gives a feel of weight to the cloth.
The Mass Density also influences the speed of the simulation; The higher it is,
the faster the simulation.
The Spring Stiff attribute controls the stiffness of the springs a
syCloth consists of. There are three Spring Stiff attributes, one for each
type of springs;
Stretching, Shearing and Bending.
Having control over the stiffness of each
type of springs independently, allows a range of options for defining
the cloth characteristics.
The Stretch Stiff value is usually higher than that of the Shearing, and the
Shearing value is higher
than the Bending. The Spring Damp value needs to be adjusted to control unwanted
vibrations.
Follow the values provided here to start with. After we pin the cloth to the
string, you will be able to start playing with those values, and conveniently see how
they affect the animation.
04. CREATE WEIGHT, add Gravity and global Damping:
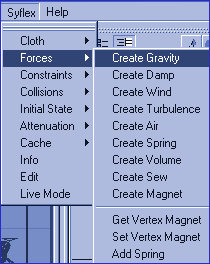
SyFlex' Forces menu
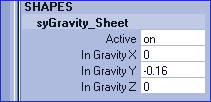
Gravity attributes

Global Dump attributes
The Gravity, like all the rest of the forces and constraints in syFlex,
obeys the normal laws of physics. It is always possible to make exact measurements
and calculations (for example, find the Mass Density of a real cloth, and use the
value in your scene).
SyFlex artists, however, usually choose to work intuitively (go figure).
No matter which way you work, it is useful to first understand
the concept of each force, and especially,
how each parameter influences the animation.
Select your syCloth, and apply Gravity and Damping onto it:
Syflex > Forces > Create Gravity
Define the level of Gravity in the attributes window.
Select your syCloth, and apply Damping onto it:
Syflex > Forces > Create Damp
Define the level of Gravity in the Gravity attributes window.
Select the syCloth, and apply Damping onto it:
Syflex > Forces > Create Damp
Define the level of global Damp in the Damp attributes window. Damping helps
you get rid of vibrations and noise created by the motion, but it also slows
down the animation. Note how low the value is in our tutorial.
You can play the animation now and see your cloth following the law of Gravity,
computed in realtime.
If you don't have SyFlex yet, you can watch what happens in this
little movie.
05. PIN YOUR CLOTH TO THE STRING, add a constraint:
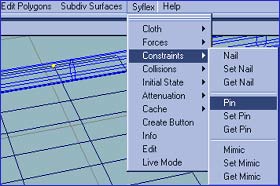
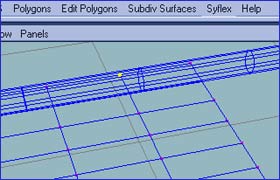
Selecting the vertices to be pined and the String
SyFlex' Constraints menu
Select the corner vertices of the sheet, and the string, and call:
Syflex > Constraints > Pin
Run the animation, or watch this little movie...
Cool, no?
What's really cool, is that the animation is still computed in realtime.
Now it's time to start playing with the Spring Stiff, Mass Density,
Gravity and Damp parameters, and discover how to make the cloth
behave in different ways.
You can also try creating sheets in different sizes. The attributes values will have
to change proportionally to the change in dimensions.
Try also animating sheets in different
resolutions. You will see that the higher the resolution is, the more wrinkles
are created, while it also makes the simulation slower.
06. BLOW SOME WIND, add another force:
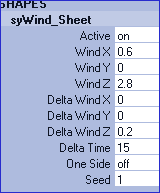
Wind Attributes
Just for fun, we also added wind.
Select the syCloth, and call:
Syflex > Forces > Wind
The wind is a little tricky to control. Start by entering the values
suggested here.
Run the animation (yes, we have another
little movie, 82 KB...)
Add your texture...
Keep playing!...
Note: The clips we prepared for this tutorial are simulated using
the syFlex' Pin
contraint. In the next version of syFlex, there will be a new "Button" force,
which will solve such a requierment, and all other "button situations".
In-depth information about every aspect of syFlex, including the elements used in
this tutorial, are available in the software documentation.
If you have any additional questions, do contact us at:
users@syflex.biz
|
|